

Bollards on pathways
Bollards on shared use pathways can be a serious hazard for people cycling, yet they are very common. They are usually installed to prevent unauthorised vehicles from damaging paths and verges and/or engaging in anti-social or illegal activity (such as dumping rubbish).
The problems are that bollards are often installed:
- too short to be seen by a rider following another rider (the lead rider may not know anyone is following and therefore does not point out the hazard)
- without reflective conspicuity tape and are not finished in high visibility colours, rendering them difficult to see in low light or dark conditions
- without linemarking to guide riders around the hazard
Any one of these issues can lead to a rider failing to see the bollard until it is too late, and as the post is not frangible (i.e. does not absorb impact or fold when hit) the resulting injuries are likely to be serious.
Guidance was included in the 2009 Austroads publication 'Guide to Road Design Part 6A: Paths for Walking and Cycling'. In there, the advice was that if a terminal treatment of a path consisting of isolated vertical poles (e.g. bollards), it should be at least 1.0 m high above the riding surface and have a minimum diameter of 300 mm. The second edition from June 2017 of this guide does not introduce any change to the Austroads guidance. This ViaStrada posting is particularly relevant given the limitations of the current Austroads guidance.
The following options are recommended by ViaStrada, in order of most desirable to least desirable.
These options are based upon our experience and the advice given by VicRoads in edition 17 of their Cycle Notes series. As the VicRoads website no longer hosts these documents, edition 17 is available from the ViaStrada website for your convenience.
OPTION 1: NO TERMINAL TREATMENT
The default option should be to post a shared path sign on the side of the path that indicates pedestrian and bicycle use only and leave it at that. This helps riders maintain speed, which is one of the five basic requirements for cyclists.
OPTION 2 (ADEQUATE WIDTH SITES) SEPARATE ENTRY AND EXIT PATHS WITH MEDIAN LANDSCAPING
VicRoads states "the preferred terminal treatment to restrict access and to slow cyclists down before they reach the road, the preferred terminal treatments are shown in Figure 3..." This is also shown as Figure 7.5 in the Guide to Road Design Part 6A Paths for Walking and Cycling (Austroads 2017).
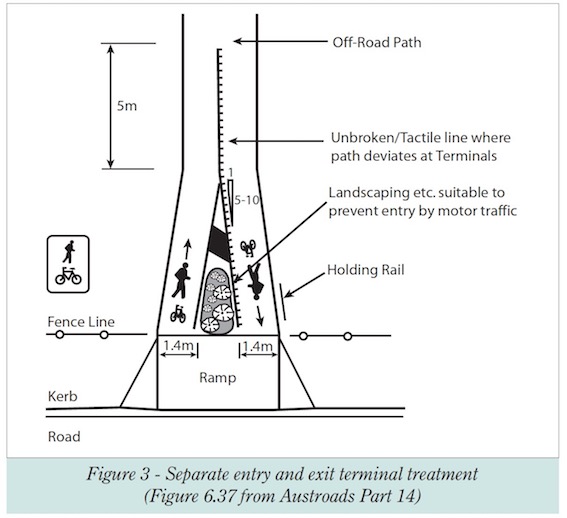
The landscaping isn't as likely to cause serious injury (as a bollard) if struck, and the profiled (tactile) line marking helps 'channelise' riders into their lane. The separate lanes also help reinforce the 'keep left' rule, leading to better behaviour along the rest of the path.
OPTION 2 (CONSTRAINED SITES) REDUCE PATH OPENING WIDTH TO NO MORE THAN 1.8 METRES
VicRoads says "If it is necessary to install a terminal treatment to restrict access by unauthorised vehicles (rather than slow cyclists down), the treatment should have an opening width of no more than 1.6 metres". In ViaStrada's experience, this can be pushed as far as 1.8 metres. The minimum opening should be at least 1.2 metres. Frangible landscaping, fencing perpendicular to the path, and/or buildings are all preferable to a bollard.
OPTION 3 - NON-FRANGIBLE VERTICAL ELEMENT
If there isn't room to do separate entry and exit paths, and there are topographical or other site constraints that preclude a narrowing of the path, then as a last resort a staggered fence, U-rail, or bollard may be specified (refer to the VicRoads and Austroads guidance for examples). Again, there needs to be a strong reason to believe that unauthorised motor vehicles will be an issue.
Staggered fences are usually more obvious than a bollard, but have the serious disadvantage of reducing cyclist speed and thereby making the route less useful (compared to staying on the road) and time competitive with driving. If there is enough room for a U-rail, then there is probably enough room for a treatment such as VicRoads Figure 3 instead.
Finally we come to centrally placed bollards. VicRoads says:
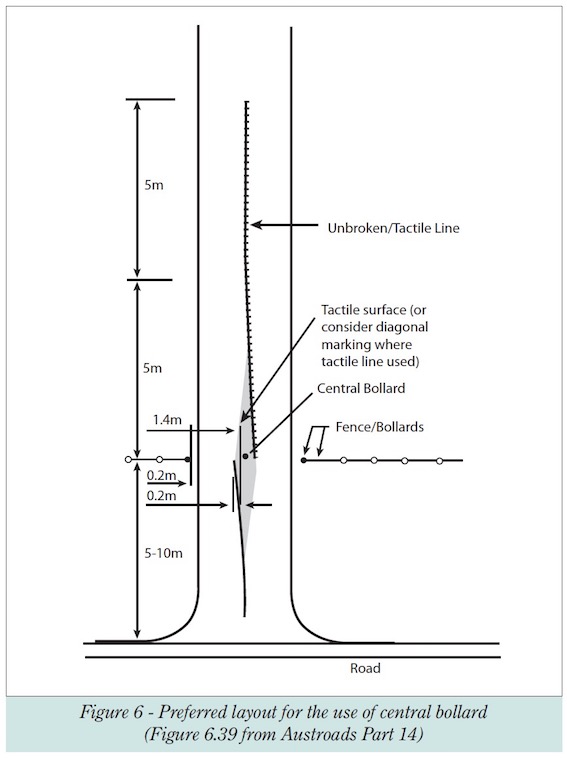
If bollards are to be used on paths to restrict access, they must be used in conjunction with a feature on the sides of the path to provide an opening of no more than 1.6 metres wide. They should also be conspicuous to cyclists and include linemarking to direct cyclists away from the bollard. These details are shown in Figures 6...
Figure 6 in VicRoads (2005) is also shown as Figure 7.6 in Austroads GRD6A (2017).
As noted at the start of this post, the three main requirements for a bollard installation are:
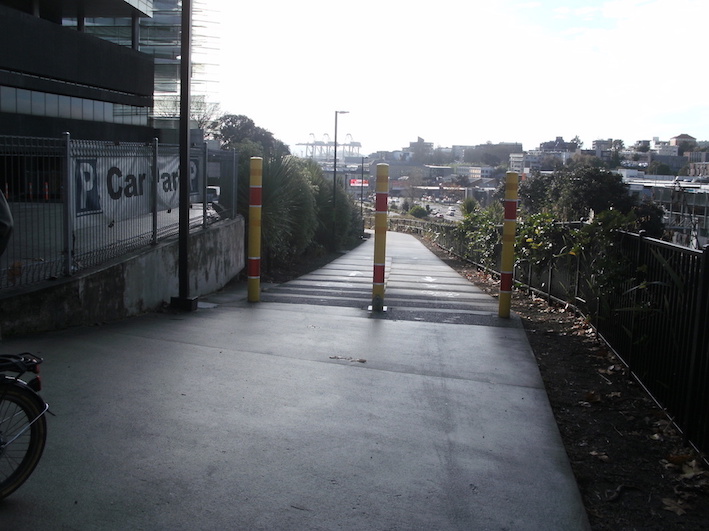
- Adequate height (at least 1.8 metres) such as shown in the first picture of the Grafton Gully path in Auckland so that a rider following another has an opportunity to see the bollard in advance. If the bollard is not high enough, a sign attached to the bollard of adequate height can address this requirement.
- High visibility: the bollard should be bright white, yellow or red with contrasting reflective bands
- Well marked with tactile profiled line marking as per Figure 6 in VicRoads Cycle Note 17.